Menu Bar

Monday, September 30, 2013

Weekday Lunchbox Chicken Salad

Like a lot of people my husband and I try to save money where we can by doing things for our selves. We use our freezer liberally to buy meat in bulk, grow our own vegetables and herbs, gather wild apples, blackberries, beechnuts and other forest finds, and eat most of our dinners at home. One spot though, where I really struggles is the workweek lunch. Not only is it easy to make excuses about packing a lunch, but I also fall prey to the "sure I'll go out to lunch with you...I can save mine for tomorrow" trap. A big reason why I think this happens is that I'm not really looking forward to eating those standard lunches.

To help beat this trap, I make on of my lunch out favorites at home. Nine times out of ten when I go to the local sandwich place for lunch break during the week I'm either ordering a chicken salad sub or a a low carb salad topped with chicken salad.

This chicken salad is a little different - I've incorporated standard chicken salad with sweet, savory and crunchy ingredients to make it fresh and different. I love on a sandwich, topping a salad, or just by itself! I have made this salad with boneless skinless chicken breasts which I've made in the slowcooker with fresh herbs, but you could easily use meat from other parts of the chicken.


Lunch Box Chicken Salad (6 servings)
3 cups slow cooker chicken (see below) or any shredded chicken

1 large apple, chopped
1 medium onion chopped
1/4 chopped walnuts
3/4 cup light mayonnaise
1 Tb Dijon mustard
Salt & Pepper to Taste

Add all your ingredients to a large dish and mix. You may add more or less mayonnaise to your personal taste. This will store well in the refrigerator for several days.


Basic Slow Cooker Chicken
3-4 large chicken breasts
1 cup baby or cut carrots
1 sprig rosemary
1 handful sage leaves
2 cloves garlic
1 tsp salt
1/2 tb pepper


Throw all your ingredients in the crock pot and cook on low for 6-8 hours.

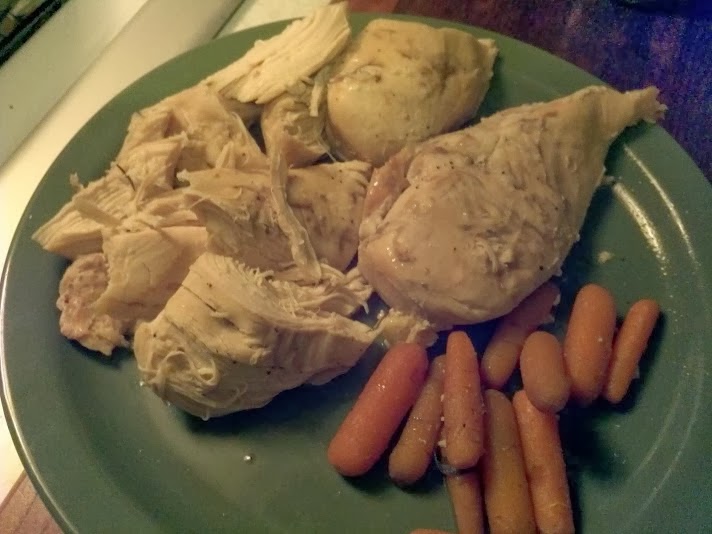
This slow cooker chicken makes an awesome alternative to boiling chicken for chicken salad, soups, tacos, etc or tastes amazing on it's own!


Sunday, September 29, 2013

Viva Pesto - Mix and Match Ingredients for Non-Traditional Pesto

Probably one of the most popular herb dishes out there is pesto. I started making pesto after I began planting herbs in my garden. Even though I was cooking with them - they were multiplying in my garden so quickly that I didn't know what to do with them so I stumbled into making pesto. This led to a few problems though. First, I didn't always have the ingredients I needed to make a traditional pesto, (How many people reaaaaaly keep pine nuts in stock at all times?) Secondly - not that I had all this pesto, what was I supposed to do with it?

First I started with a basic pesto recipe. The trick is you can mix up and switch out nearly any of these ingredients. It's as easy as picking an ingredient from each column. Bonus ingredients are optional.

Here's a couple of match-ups I made recently.


Pecan Romano Basil Pesto

1/4 cup olive oil
1 cup basil
1/4 cup pecans
1/4 cup Romano cheese
1 small clove garlic


Start by adding the nuts and cheese to the blender and grinding up well. You can add all your ingredients at once, but I find if I do this I don't get the find ground on my nuts and cheese that I want. Add garlic and blend. Add basil and begin blending - drizzle in olive oil until pesto blends smoothly at your desired texture (about 1/4 cup).


Purple Basil Almond Pesto
1/4 cup olive oil
1 cup purple basil
1/4 cup almonds
1/4 cup Romano cheese

Purple basil is one of my favorites - it adds such fabulous color to my garden and my food!

Start by blending the almonds and Romano. Add basil and begin blending - drizzle in olive oil until pesto blends smoothly at your desired texture (about 1/4 cup).


Personally I love pesto so much that I'll eat it plain over pasta or spread on crackers, but you can also try some of these ideas:
Pesto Mayo - just mix pesto into plain mayonnaise for a great sandwich spread
Cold Pesto Pasta Salad - mix in with a bit of mayo and your favorite pasta, chill and serve
Pesto Grilled Cheese - spread fresh bread with pesto, add your favorite cheese and grill
Pesto Salad Dressing - add vinegar and additional olive oil - whisk and serve

Pesto can also be frozen for later use. Most folks I know that freeze pesto use ice cube trays. Once frozen, pop out the cubes and place them in a Ziploc Freezer bag to use later.

So get out there - pick some basil (or parsley, or oregano or...) and enjoy!


Tuesday, September 24, 2013

Hubby Makes Dinner - Awesome Easy Crepes

On of my favorite stories that my husband tells from growing up is the story of his pancakes. His grandmother and later father made pancakes for him from the time he was very little and they were one of his favorite dishes. Then, one day, he went over to a friends house and the friend's parents made the kids pancakes. He was excited - pancakes were one of his favorite dishes afterall. However what was served to his wasn't recognizable to him - they were thick, doughy (what the rest of us think of as pancakes I guess!). What he had grown up with were Swedish Pancakes - more like a crepe that a traditional pancake which to this day he isn't a fan of!

Fast forward to last night. I was working on cleaning up the kitchen before making dinner. In walks my husband who offers, out of the blue, to make these Swedish pancakes for me. Here's his family recipe which I think you'll find incredibly easy!


Swedish Pancakes
3 eggs
2 cups milk
1 cup flour
6 Tb butter
1/2 tsp salt


Start by whisking the eggs with 1/2 cup of the milk for 2 minutes. Add in entire cup of flour and whisk into a thick, smooth batter - this is your opportunity to get the batter smooth, so make sure you do it right!


Whisk in salt and remaining milk. Add the butter and whisk well.


Prepare a hot pan or skillet with a nice big pat of butter.


Cook on one side until the pancake is bubble and easy to flip. Flip and finish cooking on the other side. Here's a picture of one just about ready to flip!


The serving options for your crepe are endless, I like putting jam in the middle of mine (I like blackberry, hubby likes strawberry) and topping with power sugar or real maple syrup. However, you could just as easily fill with cream cheese or fresh fruit. You can also go savory - try filling with herbed ricotta cheese and top with marinara! 


I find that a lot of people are intimidated by making Swedish Pancakes or crepes, but it really is as easy as it sounds.

Monday, September 23, 2013

Quick Project Chalkboard Kitchen Canisters

Ever since chalkboard paint hit it big, I've been dying to try it out in a home craft project. Unfortunately, as much as a think about being crafty, I don't always get around to actually being crafty. Last week though, as a part of my kitchen organization overhaul, I came up with an idea for these cool kitchen canisters.

First, I started by purchasing these glass containers with metal tops. There's lots of options at your local craft store. I then lightly sanded the tops with fine grit sandpaper before spraying with 3 coats of Krylon chalkboard spray paint. I let dry for 24 hours before priming (rubbing all over with chalk and wiping off to prevent scratching). Then just label & store!


Saturday, September 21, 2013

Kitchen Confessions - A revamped fridge

Okay - I'll let you in a little secret. Despite (or perhaps because of) all the time I spend in it, my kitchen is a hot mess! It's pretty small - has minimal storage and WAAAY too much stuff in it. However, inspired by an overload of pinterest home perfection pictures I've decided it's time to take my kitchen back - one crafty solution at a time.

Today's project - the fridge. Here's what it looked like before. Sadly enough - this picture was AFTER I cleared off a couple things - scary I know!

First I wanted a chalkboard menu board look for my fridge, but I am not brave enough to actually paint the fridge itself - though I've seen some amazing examples of this on pinterest. I settled for a 
pre-made chalkboard from my local craft store that was about the size of my freezer door and some extra strength craft magnets.


To adhere the magnets - nothing beats good ol' hot glue. I got my mini gun warming up to start.

Next, I adhered the magnets to the back using the hot glue. I used 10 total around the edges.


Viola - the only thing left to do is fill out my board using some colored chalk - also from the local craft store:

I am not an artist by any means, but I was rather proud of my apple:


Now that I had my menu board in place, the next task was tackling the pile of photos and papers everywhere on my fridge. I started by painting some plain clothe pins with burgundy colored spray paint. I like to spray small objects inside a large shallow box to minimize mess.

Once completely dry I broke out my trusty glue gun once again and attached extra strength refrigerator magnets to the clothes pins.

It's as easy at that - the pins can be used to clip papers and photos.


Of course my husband (a bit adverse to change) had to make his mark. Once he was done, I ended up with a little magnet row:

At least, though I got to send quite a few to the magnet graveyard! 

Finally - I needed to tackle the top of my fridge. Here's the before.As you can see - the top of our fridge as doubling as a bar/junk storage area.

I found these really neat chalkboard front bins on half price sale as Joanne Fabrics. I used one to corral up all those liquor bottles and a second for cearal and other misc items from the top of my fridge.

Here's the before and after with everything included:


Wednesday, September 18, 2013

Pressure Canning Green Beans

My second crop of green beans is ready to harvest. This gives me a great chance to try out my new pressure canner - a birthday gift from my hubby!

I started by cutting the ends off my beans and cutting into bite sized pieces with a paring knife.

Once all cut and rinsed, I packed tightly into clean, sterile pint mason jars.
Top the beans off with boiling water, leaving 1 inch of head space. Process in a pressure canner for 10 minutes.


Monday, September 16, 2013

A Week of Bounty - and the easiest way to freeze corn.

Our freezer runneth over this week! Last week, we went to pick up our fresh pig from the butcher. Good friends of ours purchased a pig and were willing to split with us. My freezer is packed full of meat as well as the pork fat (which the hubby and his friend will use for venison sausage during deer season!) I see a lot of pork chops in our future.


Among our pork treasures is fresh bacon. The hubby put a nice batch of this right in the smoker - we can't wait to try it! I also got some nice ham slabs which I can't wait to try curing. If anyone has any tips for a first time ham curer let me know!

Several friends have asked me how I store meat in the freezer. To me purchasing meat is a big investment into future meals from my family - I don't want to leave anything to chance or freezer burn. I'm normally not a brand conscious person, but I wrap my meat in freezer paper and then store in Ziploc brand freezer bags. I haven't had as much luck as any other brand. Using this method, I typically can even get several extra months for anything that I freeze without sacrificing quality.

If the pork wasn't enough, our good friends also came into 12 dozens of free corn from a neighbor farmer who was about to toss it.


Our friends had never preserved corn before so I was happy to have them over and show them the easy method for freezing corn I grew up with. I can remember growing up - my father, a dairy farmer who always planted plenty of sweet corn in the summer - bringing home at least a dozen ears every night for dinner when corn was in season. My mom would boil them all up and anything not eaten at dinner would get processed and frozen. By the end of corn season we always had enough corn frozen up to enjoy through the whole winter!


I always start my corn by husking and getting off as much of the "hair" as possible. The husked ears go into a clean sink full of cold water. This helps get any remaining tassel off the corn.

On the stove bring a large pot of water to a boil. Adding the corn - a half dozen ears or so  at a time - and blanch in the boiling water for about 6 minutes. Transfer the corn to a sink or clean plastic tub full of cold water. Once cool enough to handle, cut the corn away from the cob.

Scoop the corn into plastic bags in whatever serving size your family will normally use for 1 dinner. Freeze for up to 6 months.

When ready to serve warm on the stove top or in the microwave with a bit of butter and salt.

Now if only I could decide what to make for dinner tomorrow - pork chops and corn anyone?


Friday, September 13, 2013

Home Canned BBQ Sauce

In my house, we absolutely LOVE barbecue sauce and go through lots of it. So what better to do with a batch of extra tomatoes than make our own home canned sauce.

Home Canned BBQ Sauce
15 medium/10 large tomatoes
1 hot pepper (choose your pepper to match your desired heat)
1 sweet bell pepper
3/4 cup brown sugar
3/4 cup apple cider vinegar
2 cloves garlic
1 cup chopped onion
1 tb dry mustard
1 tb paprika
2 tb hickory smoke salt
1/4 teaspoon cayenne pepper


Once you've assembled your ingredients, you'll want to start be peeling your tomatoes and removing as much of the water and seeds as possible. I use the same method to peel tomatoes for all kinds of uses (this works well for peaches also). First you'll want to start with a large pot of boiling water.

I call this the three station method. Fill your sink with cold water. You'll also need a large bowl to hold the seeds, juice and peel and another bowl to hold your prepped tomatoes

To easily remove the peel, drop your tomatoes in the boiling water. Let boil for about 1-2 minutes - you'll likely see the peel begin to lift. Transfer the tomatoes from the boiling water into the cold water in your sink to make cool enough to handle. The skin should easily pull away from the tomato flesh with a little encouragement from a paring knife. Cut out the core of the tomato and remove as much of the seeds and water as possible. 


Once you've process all your tomatoes, transfer to a large pot on the stove. Add your other ingredients. Add remaining ingredients to your pot.

Bring to a boil over medium heat. Reduce to a simmer and boil for 30 minutes. Transfer all ingredients to a blender and blend until smooth.

Return the blended sauce to your pot. At this point, you have a nice consistency - similar to a chili sauce - and could go ahead an can now. However, I was really looking to get a lot closer to that smooth BBQ sauce consistency. To do this, simmer on low heat for an additional hour stirring occasionally. Run through the blender a second time. 

To can the sauce, transfer to clean pint or half pint jars. Process in a boiling water bath for 25 minutes. You can also process in a pressure canner if desired for 20 minutes with 10lbs of pressure.


Enjoy!


.